Summary
When you first start up your Mac, you're greeted by the Finder, which allows you to visually access practically everything on your Mac, including applications, hard disks, files, folders, and CDs. You can use the Finder to organize all your files and folders as neatly or as messy as you want, search for stuff anywhere on your Mac, delete things you don't want, and more.
Finder Windows
To see all the goodies on your Mac, double-click the hard disk icon. Note: An icon is a small graphical representation of an item such as a file, folder, application, CD, or drive. This opens a Finder window, which allows you to visually see the hierarchy of your computer's contents.
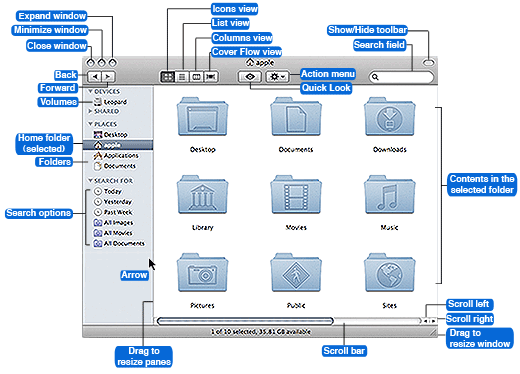
Finder windows generally include a sidebar on the left side. Items are grouped into categories: places, devices, shared computers, and searches — just like the Source list in iTunes. Whatever mounted and accessible volumes you have, such as a hard disk, iDisk, network, CD, DVD, or iPod, in the top portion. The bottom portion contains your user account folder, aka Home folder—the folder named after your user account name, some of the folders found in your Home folder include (Desktop, Documents, Movies, Music, and Pictures), and the Applications folder. This is what it looks like:
To really get an idea about how all these standard Finder window elements function,
select stuff, double-click things, push buttons, and drag things around.
select stuff, double-click things, push buttons, and drag things around.
The contents of the selected folder or volume appear in the right pane. Depending on what view your Finder window is set to, this pane may look a little different from ours, our window above is shown in icons view. In icons view, you can navigate through your hard disk contents by double-clicking the pretty folders to view the contents inside.
To go back one folder, click the Back button in the toolbar. To close the window, click the round, red button in the upper-left corner. If you don't want to close the window but want it out of your way, click the round, yellow button to minimize the window to the Dock. If a window is chock full of stuff, you can resize it by dragging the lower-right corner to make it bigger, or click the round, green button to maximize the window's size.
Tip: Want to learn how you can customize the Finder window for your needs? Be sure to check out "Modify Your Windows."
If you'd like to change how folder and volume contents appear in the right pane, click one of the view buttons in the toolbar. For example, when we click the list view button, our Finder window magically transforms itself into this:
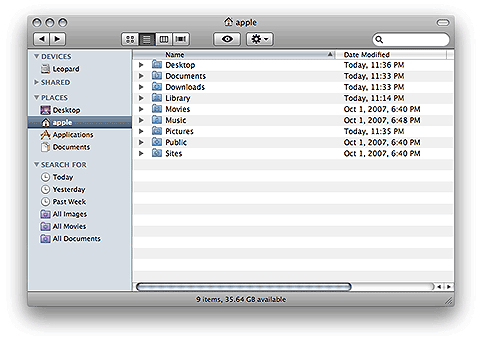
In list view, the Finder window displays folder or volume contents as a list,
which can be sorted by name, date, kind, or other criteria.
which can be sorted by name, date, kind, or other criteria.
List view enables you to see more content in the window than icons view, and displays some extra file and folder information, such as the last date the item was modified, the file size, and what kind of item it is. As in icons view, you can navigate through your stuff by simply double-clicking folders until you find what you're looking for.
If you'd rather see your stuff displayed in a more hierarchical fashion, click the columns view button. In columns view, the right pane splits into multiple columns to display your computer's file and folder organization. Instead of double-clicking folders to see what's inside, select a folder in any column, click on it once, and its contents will appear in another column to its right. If you really start digging down deep into your folder, you can drag the bottom-right corner of the Finder window to expand it and see how many layers you've traveled.
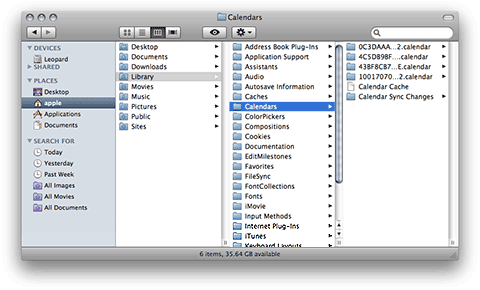
In column view, you get a better view of your hard disk's folder hierarchy as you look for stuff.
Getting Around
The hard disk icon represents your computer's hard drive. As we said earlier, you can access everything on your Mac by double-clicking this icon to open it, and then opening any subsequent folders to find whatever you're looking for. At the top level, you'll find the Applications, Library, System, and Users folders, plus a few others. Both the Library and System folders contain system-level files, so don't mess around with their contents until you fully understand what you're doing.
The Applications folder contains all the applications installed on your Mac. It also includes a Utilities folder, which contains a bunch of utilities, programs that are designed to support different functions of your Mac.
The Users folder houses all the content for each user on your Mac; each user gets a separate Home folder that's named after his or her user account name. Whatever you do, do not rename your Home folder; doing so can make it impossible for your Mac to access pertinent resources. The active account's Home folder, the user who's currently logged in to the computer, displays a little house as its icon instead of a folder. Each Home folder contains a series of subfolders—Desktop, Documents, Library, Movies, Music, Pictures, Public, and Sites.
When you put stuff on your desktop, technically it's being stored in your user account's Desktop folder, even though to you it appears on your desktop. When you bring music into iTunes, your music files get stored in the iTunes folder in your user's Music folder. Likewise, iPhoto stores pictures in the Pictures folder and iMovie stores movies in the Movies folder. You can get quick access to your user account folders from any Finder window sidebar.
Find Stuff Fast
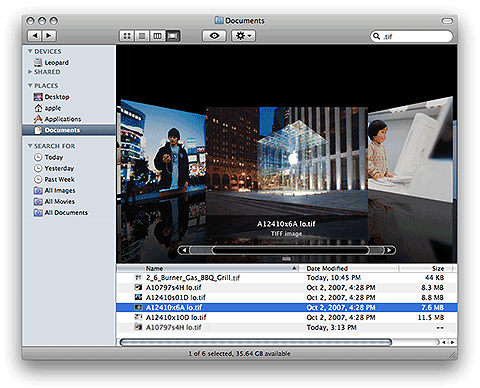
Sometimes it can take a little effort to navigate through a lot of folders to find what you want, but you can find stuff quickly using the search field in the Finder window. This field uses the Leopard Spotlight technology to scour any volume you select. For more information on using Spotlight, see the "Spotlight" lesson. Combine Cover Flow with Spotlight and you’ve got one amazingly powerful search tool. Use your mouse pointer and hover over the file to shuffle through them visually.
The Finder window's search field uses powerful Spotlight search technology to find anything anywhere.
Just start typing in the search field, and Spotlight dynamically displays results in the Finder window that match your criteria as you type. You can choose where you want Spotlight to look by clicking on an item in the header, such as Servers, Computer, Home, and more, that appears just below the search field in the Finder window. Spotlight will scour the location you select and organize its search results by kind.
For example, if you wanted to find all the JPEG (.jpg) images on your Mac, type .jpgin the search field, and you'll immediately see results pop into the window. Click Computer in the header to find all JPEGs on your entire hard disk. Not only will Spotlight display thumbnails, small images, of your JPEG images, it'll also list other things that match your criteria, such as documents that contain the word ”.jpg” in them. You can then access the file right from that Finder window.
Files, Folders, Action!
While you'll generally find files and folders in any given Finder window, the window also features an Action menu, which lets you easily perform commands on a selected file or folder, such as make a duplicate, move it to the Trash, or create an archive for sending.
To access the Action menu, click its gear button at the top of the window; the button turns blue to indicate that it's active, and a pop-up menu full of commands opens. To put it in use, select a file or folder and then click the Action menu. Choose any action from the menu by clicking it. If you don't want to choose an Action item, click anywhere outside of the menu to close it.
Or, say you’re flipping through files in the Finder. But you’re looking for something specific and you don’t have time to open lots of files to find it. Enter Quick Look. It gives you a sneak peek of entire files — even multiple-page documents and video — without opening them.
We used the Quick Look to instantly view a slideshow of our selected photos.
Other Ways to Make the Finder Active
Besides double-clicking your hard disk or having the Finder active on start up, you can make the Finder active by doing any of the following: