Summary
The Finder lets you organize, view, and access practically everything on your Mac, including applications, files, folders, discs, SD memory cards, and shared drives on your network. The desktop is the space where you see file, folder, and volume icons.
Products Affected
Mac OS X 10.6
The Finder is represented by a blue smiling face icon on the Dock, as shown below (clicking the Finder icon in the Dock brings the Finder to the foreground). When you connect a hard disk, DVD or SD memory card to your Mac, its icon shows up on the desktop and Finder window sidebars.
Summary of improvements in Snow Leopard
- The Finder has been completely rewritten using the modern Cocoa framework in Mac OS X, taking advantage of the new technologies in Snow Leopard--including 64-bit support and Grand Central Dispatch. The familiar Finder interface is unchanged, but you will discover the Finder is faster and more responsive. It also includes an enhanced icon view with live file previews, so you can thumb through a multipage document or even watch a QuickTime movie.
- Snow Leopard improves the reliability of ejecting discs and external drives. Sometimes when an application or process is using the files on a drive, Mac OS X prevents you from ejecting it, but you might not know why. In Snow Leopard, you should see fewer of those situations, and when you do get them, you’ll be told exactly what is using the drive, so you can quit it and eject the drive properly.
Elements of the Finder
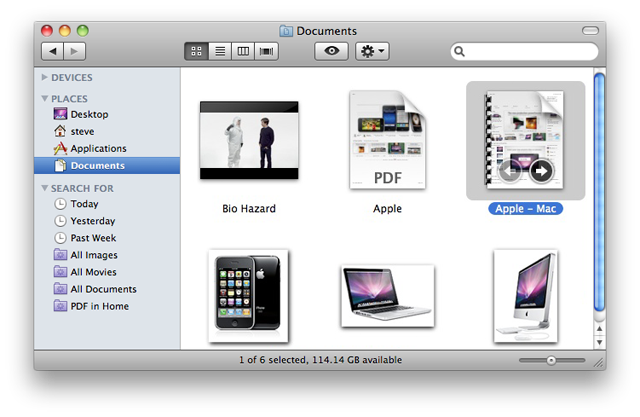
This is a sample of what a Finder window looks like (in Cover Flow view mode):

- Apple Menu - Access items such as Software Update, System Preferences, Sleep, and Shut Down.
- Menu bar - Contains the Apple menu, active application menu, menu bar extras and the Spotlight icon. The Finder menu has items such as Finder Preferences, Services, and Secure Empty Trash.
- Finder window close, minimize and zoom buttons.
- Finder window View buttons:
- Icon view - Used to display the contents of your folder as a series of icons. Snow Leopard introduces live icon previews that you can use to thumb through a multipage document or watch a QuickTime movie.
- List view - Used to display your folder in a spreadsheet-style manner. Each folder can be expanded by clicking on the disclosure triangle just to the left of the folder. You can easily sort by file name, date modified, and so forth. Choose Show View Options from the View menu to add / remove attribute columns. You can change the sorting from ascending order to descending order and back again by clicking on the attribute column title.
- Column view - Used to display the hierarchy of your hard disk where each column represents a folder.
- Cover Flow view - Used to display the contents of your folder just like the Cover Flow used in iTunes. You can see live previews of images, documents and movies, and can thumb through documents and movies.
- Quick Look button - Click it to bring up a Quick Look preview of the file you have selected. See the Quick Look section below for more details.
- Action Menu - Quick access to Finder functions for highlighted items, such as Get Info, Move to Trash, and Services.
- Search Field - Start typing a word or phrase and Spotlight will search your Mac for any matches. See the Finder Preferences section below for information about how to set your default search.
- Hide / Show Finder window toolbar & sidebar - Click it to hide or show the Finder window toolbar and sidebar.
- Spotlight icon - Click it to bring up the Spotlight search field, where you can search for anything on your Mac.
- Back / Forward buttons - As you move to different places in the Finder window, you can use the back button to return one step back and the forward button to go forward.
- Sidebar - Items are grouped into categories: Devices, Shared, Places, and Search For — The top portion has Devices and Shared which contains whatever is connected to your Mac, such as a hard disk, iDisk, network share points, SD memory card, or DVDs. The middle portion has Places which contains quick access to your Desktop, Home folder—the folder named after your user account name, Applications and Documents. The bottom portion has Search For which contains quick access to Smart Folders that will find any file on your Mac that was used Today, Yesterday, Past Week and document types like All Images, All Movies, All Documents.
- Cover Flow content- Showing you a live preview of your files, where you can page through a document or watch a QuickTime movie.
- The Finder application icon - Click it to bring the Finder to the foreground and open a Finder window if none are already opened.
- The Dock - Quick access to the Finder and your most frequently used applications, folders, and files. With a single click the application, folder, or file opens..
- Trash - deleted items are kept here until you empty the Trash. You can also eject DVD's, SD memory cards and drives connected to your Mac by dragging them to the trash. Note: Snow Leopard introduces the Put Back option for files in the Trash. See the below for details.
Tip: Want to learn how you can customize the Finder window for your needs? Be sure to check out "Modify Your Finder Windows."
Finder Preferences
Finder preferences let you configure file labels, search locations, Finder window sidebars, and hide or show hard disk icons on the desktop. To open Finder preferences choose Preferences from the Finder menu, or press Command-, (The Command key and the Comma key).
In the General tab you can configure what kind of items appear on your desktop. For example, you can have your internal hard disk appear on the desktop or not. Your hard disk will appear in the Finder windows sidebar. If no Finder window is open, you can open a new one by clicking the Finder icon on your Dock.
In the Label tab you can assign special titles to your labels. For example, you can customize the labels to be a priority level or a project name. This can make for easy Spotlight searches based on your priorities and projects.
In the Sidebar tab you can customize the kind of devices that will appear on your Finder window sidebars (changes affect all Finder window sidebars).
In the Advanced tab you can set the initial search locations in your Finder windows search field (item 7 above).
- Search this Mac - Will have the search results pertain to any file on your Mac.
- Search the Current Folder - Will have search results restricted to the folder you have open and its subfolders.
- Use the Previous Search Scope - Will have search results based on the last customization search you performed.
Finding items you want
Finding items on your Mac is easy with Spotlight. Using the Finder search field, you can quickly use Spotlight locate what you want.
In the Finder window search field (item 7 above), just type in a word or phrase to search your Mac for. Your Mac will begin to find any items that contain what you have typed in. Refer to the above Finder Preferences section for information about how to configure your default search.
You can refine your search further with just a few clicks and selected options. This custom search can then be saved as a Smart Folder on your sidebar that automatically updates with new items when you click it.
Click here to see a sample search
Quick Look
Quick Look is a fast and easy way to see a preview of your images, documents, movies, and even Microsoft Office documents without opening them in an application.
Simply highlight an item you would like to Quick Look. Press the spacebar or click the Quick Look button in the Finder window (item 5 above). The Quick Look window will appear showing you the contents of your file. If it is a document, you can page through it. If it is a movie, you can play it, even in full screen mode. If you highlight several images, you can start a slide show of those images. Press the spacebar, Esc key, or Quick Look button again to exit Quick Look.
Tip: Quick Look also works in the Time Machine backup interface, which is a great way to check an item before restoring it from a Time Machine backup.
Enhanced Icon View
As with Cover Flow and Quick Look, you can thumb through a Document or watch a QuickTime movie right in the Finder window in icon view.
If you have a multipage PDF document, you will see a "book binding" graphic on the left side of the PDF icon.
If you hover your mouse pointer over a multipage document and you will see arrow buttons that let you thumb through your document.
If you hover your mouse pointer QuickTime movie, you will see a play button. Click it to watch the movie play. The button becomes a pause button to pause playback.
By using the Icon Size slider located to the left of the Finder window resize control, you can adjust the size of your icons all the way up to 512-by-512 pixels (which is four times larger than Mac OS X v10.5).
Restoring deleted items to their previous location
If you put an item into the Trash from your Desktop or Finder window, you can restore it to where it was before it was placed in the Trash (if you haven't emptied the Trash yet).
Open the Trash (item 15 above) by clicking on it in the Dock. Select the item(s) to move back, then choose Put Back from theFile menu. Or, you can Control-click or right-click the item and choose "Put Back" from the contextual menu.
Removable sidebar headers
If you prefer a minimal sidebar, you can remove all items under a sidebar header (Devices, Shared, Places, Search For). The sidebar header will then disappear.
To restore the sidebar header, simply drag an item onto the sidebar that would be contained in the sidebar header. The sidebar header will return and contain the item you dragged over. For example, dragging the documents folder to the sidebar returns the Places header.
Sortable search results
After performing a search by entering a word or phrase in the Finder window search field (item 7 above). You can then sort the results by clicking the Action Menu (item 6 above) and choosing the desired "Arrange By" option. Note: You can add / remove "Arrange By" options by using the "Show View Options" Action Menu item.
Getting around
The hard disk icon in your Finder window's sidebar represents your computer's hard drive (typically called Macintosh HD). You can access everything on your Mac by clicking this icon in the sidebar to open it, and then opening any subsequent folders to navigate to whatever you're looking for. At the top level, you'll see the Applications, Library, System, and Users folders, plus a few others. Both the Library and System folders contain system-level files--you shouldn't add anything to, or remove anything from, these folders unless you fully understand what you're doing.
The Applications folder contains applications installed on your Mac. It also includes the Utilities folder with applications that are designed to support different functions of your Mac (such as Disk Utility and System Profiler).
The Users folder houses all the content for each user account on your Mac; each user has a separate Home folder that's named after his or her user account name. The active account's Home folder, the user who's currently logged in to the computer, displays a small house as its icon instead of a folder. Each Home folder contains a series of subfolders--Desktop, Documents, Library, Movies, Music, Pictures, Public, and Sites.
When you put stuff on your desktop, technically it's being stored in your user account's Desktop folder, even though to you it appears "on" your desktop. When you bring music into iTunes, your music files get stored in the iTunes folder in your user's Music folder. Likewise, iPhoto stores pictures in the Pictures folder and iMovie stores movies in the Movies folder. You can get quick access to your user account folders from any Finder window sidebar by clicking the house icon.