Summary
 Whether you've got all your contacts stored neatly in an electronic device or are still hanging on to your tattered address book, personal organizer, or business card collection, Address Book makes it simple to manage your contacts.
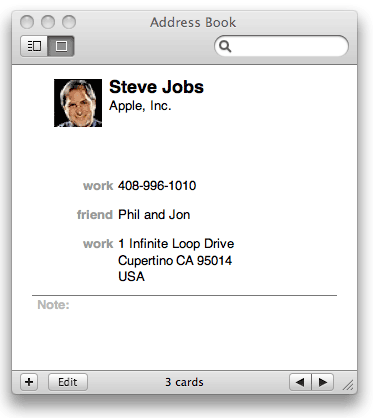
Address Book keeps all your VIPs right at your fingertips.
Products Affected
Mac OS X 10.6Create a new contact
If you want to add someone to Address Book, here's how to create a new card.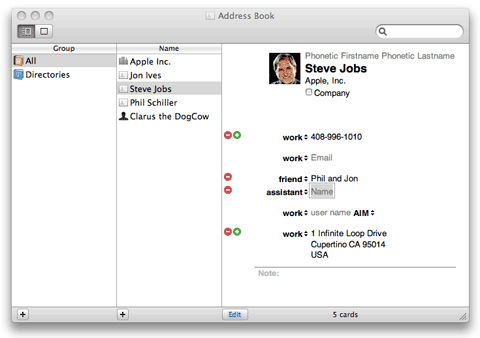
Enter as much or as little contact information as you wish; if you leave a field blank, it won't appear in the final card.
- Open Address Book from the Dock. The interface displays a Group column on the left (for grouping contacts), a Name column in the middle (that displays all contact names in your selected group), and a card pane on the right (for viewing a selected contact's information).
- Click the plus sign (+) button below the Name column to create a new contact card.
- Enter the person's name and contact information in the designated fields, just click a field and type away. Note that each type of contact (Phone, Email, Names, addresses, and so on) is grouped in sections on the card.
- Some of the fields display a pop-up menu to their left, allowing you to choose a label for that field. For example, if you want to enter someone's cell phone number, click the pop-up menu next to any Phone field and choose mobile.
- If you have more contact information than the allotted fields, click the green plus sign (+) that appears in that category section to add another field.
- To add additional fields, from the Card menu, choose Add Field, then choose a category from the submenu (such as URL, Birthday, or Job Title).
- If you want to add any extra information, type it in the Note section.
- You can have Address Book display a picture of the person or any image that you want. To add a picture, just drag any image file onto the square next to the person's name at the top of the card.
- When finished, choose Save from the File menu (or press Command-S).
Using Address Book
Here are some of the things you can do in Address Book.- To send an email to one of your contacts, select the person's name in the Name column, click the label to the left of the email address to open the pop-up menu, and choose Send Email.
- If you prefer to see only contact cards instead of the three-pane display, click the "View card only" button in the toolbar in the upper-left corner. To pull up someone's contact information, either type his or her name in the search field or use the arrow buttons on the bottom-right corner to scroll through your contacts.
- If you want to be able to address a group of people in an email instead of entering all their email addresses, create a group. Click the plus sign (+) button below the Group column, type a name for your group, select All in the Group column, and then drag names from the Name column onto your new group in the Group column to add them.
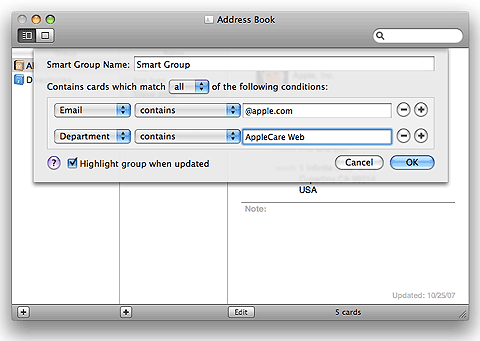
- You can also create a Smart Group, a group that automatically updates itself if any contact fits the same search criteria you set for a Smart Group. To create a Smart Group, choose New Smart Group from the File menu, type a name in the Smart Group Name field, set your search criteria using the pop-up menus and fields, for example, choose Company from the first pop-up menu and type a company name in the field to create a Smart Group of people at that company, and click OK. Any contacts that match your search criteria will become part of this Smart Group.
 If you frequently send email to a group of people, like all your coworkers,
create a Smart Group, which automatically updates on its own. - If you miss having a tangible address book, print out a pocket-sized version of Address Book. Select the names that you want to include from the Names column, or select a group, and choose Print from the File menu. In the resulting dialog, choose Pocket Address Book from the Style pop-up menu, select any other options you want, and click Print.
- It’s also a good idea to back up your Address Book.
Tip: Want to learn more about Address Book? Check out the built-in Address Book Help guide on your Mac (in Address Book, choose Address Book Help from the Help menu).