Summary
Learn about The Dock, Dock Exposé, Dock menus, and Stacks in Mac OS X v10.6 and later.
Products Affected
Mac OS X 10.6
The Dock
The Dock is at the bottom of the screen (by default) and gives you quick access to your applications and files. When you click an icon on the Dock, the associated application, file, or folder opens. Open (running) applications are indicated with a bright dot that appears below the icon. To use an item in the Dock, just click its icon. For example, if you want to listen to some music, click the iTunes icon (the disc icon with musical notes) to open iTunes.
Dock elements
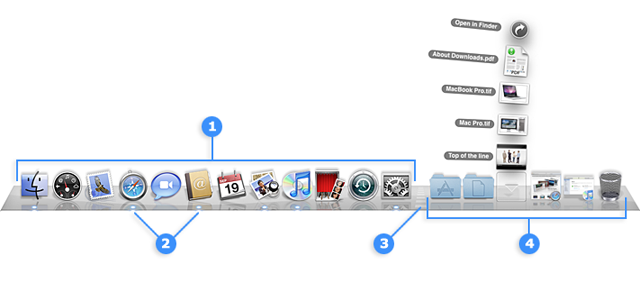
- The Application icons - Finder is always leftmost. All the other icons are Application icons of your choice.
- Bright dot - Indicates open (running) applications.
- Dock size adjuster - Click and dragging up to grow the Dock or dragging down to shrink the Dock. Tip: Control-click or right-click it to bring up its Dock menu, where you can adjust or open Dock Preferences.
- Folders, minimized windows, documents and Trash - Clicking a folder will expand it to the stack of your choice (a fan stack in this example). See the stacks section below for details. By default you have a stack for your Application, Documents and Downloads folders.
To bring any currently running application to the foreground, click its icon in the Dock (the active application's name appears in the menu bar to the right of the Apple logo).
If you minimize a Finder or application window (by pressing Command-M, for example), the window gets minimized to the right side of the Dock. Click the window's icon to make it appear again.
The Dock keeps applications on its left side with the Finder always being leftmost, while to the right side are folders, documents, minimized windows and the Trash is always rightmost. If you look closely, you'll see the Dock size adjuster that separates them. (If you've moved your Dock to the side of the screen, Finder is always the top icon and Trash is always the lowest icon.)
If you want to rearrange where the icons appear, just drag a icon to another location on the Dock and drop it.
When you quit an application whose icon resides in the Dock (such as Safari or Mail), the dot disappears, but the icon remains. When you quit an application whose icon doesn't reside in the Dock (for example, if you just finished playing Chess but don't keep a Chess icon in the Dock), its icon disappears from the Dock.
Adding and removing items from the Dock
If you want to add an application, file, or folder to the Dock, just drag its icon from any Finder window (or the desktop) and drop it on the Dock; the icons in the Dock will move over to make room for their new neighbor. The resulting icon that appears in the Dock is an alias that points to the original item. If you drag an application or file onto the Dock, you'll be able to open it anytime by simply clicking its docked icon.
To remove an item from the Dock, drag its icon off the dock. The Finder and Trash icons cannot be removed. The original item that the Dock icon pointed to is not deleted when you do this.
If you drag a folder onto the Dock, a Stack will show the folder's contents when you click the folder icon in the Dock. See the below section's Stacks information for details.
Exposé
Exposé lets you view all open windows with a single keystroke. Exposé unshuffles overlapping windows on your desktop into an organized tile view, so you can quickly locate and switch to any window or get to any file on the desktop.
If you like to work with many applications and documents at the same time, you probably spend time each day poking through your open windows just to uncover the one you need at the moment. With one keystroke, Exposé instantly tiles all your open windows, scales them down, and neatly arranges them, so you can see what’s in each one.
You can navigate from one tiled window to the next, and you’ll see its title displayed in the bottom center of the window. When you find the window you need, simply click it. Every window then returns to full size, and the window you clicked--whether it’s a folder, a PDF, a QuickTime movie, a Pages document, or anything else--becomes the active window.
Exposé key
F3 - With recent Apple Exernal USB keyboards and built-in portable keyboards (such as on MacBook Pro computers), the F3 key activates Exposé (with earlier keyboards, the F9 key does this by default). Tip: When viewing tiled windows, hit command 1 to view the tiles in alphabetical order or hit command 2 to view the tiles in application order.

Here are some other Exposé key commands:
- Control-F3 - Shows all windows of the Application you are in, regardless of what space it resides in. This is the same as Dock Exposé (see below). (Use the F10 key on earlier keyboards.)
- Command-F3 - Hide all windows and show your desktop. (Use the F11 key with earlier keyboards.)
Dock Exposé
New in Mac OS X v10.6 Snow Leopard is Dock Exposé--a quick and intuitive way of seeing all of the windows for an application.
When you click and hold an active application icon on the Dock, Dock Exposé shows you a thumbnail of every open window for an application, regardless of the Space your application windows reside in or minimized application windows. Just click the Window tile you would like to work on and it will instantly appear.
Dock Exposé elements
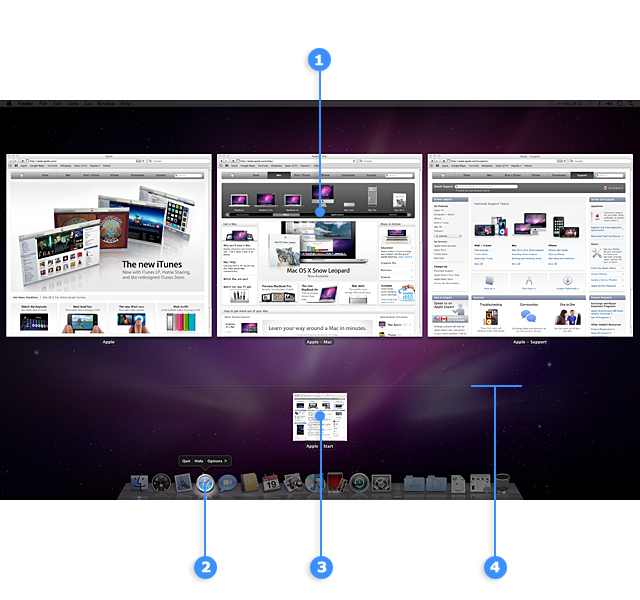
- Application window that is highlighted - To select it as the active window, click it or press the return key. Tip: Press the Spacebar to zoom in and out of a full size preview of the window.
- Source application icon for Dock Exposé - Highlighted with a "spotlight" effect to let you know which application's windows are being shown. Tip: If this is not the application you want in Dock Exposé, simply click the dock icon of the open application you do want or use command tab to rotate to your desired application and Snow Leopard will instantly shift Dock Exposé's focus to that application.
There is also a dock menu from the open application, where you can Quit or Hide the application. Hovering your pointer over the Options choice will show these three options:
- Keep in Dock - When selected, the icon will remain in the Dock when the application has quit. Click it to cycle this on/off.
- Open at Login - When selected, the application is added to your Login Items list. When you log in to your account (or when Mac OS X automatically logs in), the application will automatically open. Click it to cycle this on/off. (You can also adjust Login Items in Users preferences, in System Preferences.)
- Show in Finder - This will open the folder where the application resides on your Mac and select the application.
- Application window that is minimized.
- Minimized window divider line - Present only if your application has minimized windows; above the line are windows that are not minimized, below are minimized windows.
Tip: You can use spring-loaded Dock Exposé to copy files in Finder or attach a file to a application document. For example, to attach a file to your email message: Drag the file you would like to attach, to your Mail icon on the Dock and hover it until Dock Exposé is activated, then drag your file to the tiled window of the email message you would like to attach and hold until the window moves to the foreground. Drag the file to where you would like to attach it in your message and release the mouse button.
Here is a movie that demonstrates how to use Dock Exposé to attach a file to an email message:
Dock Menus
Dock menus appear when you Control-click or right-click an icon in the Dock.
All application, folder, and file Dock menus have an "Options" sub-menu containing these options:
- Keep in Dock / Remove from Dock
- Keep in Dock - When checked, the icon will remain in the Dock when the Application has quit. Clicking it cycles the check status on and off.
- Remove from Dock appears in the Dock Menu of an inactive application that is set to "Keep in Dock" or on a folder / file.
- Open at Login - When checked, the Application is added to your Login Items list found in your user account system preference. When you log into your account, the application will automatically open. Clicking on it will cycle it being on or off your Login Items list.
- Show in Finder - This will open the folder where the Application resides on your Mac and highlight the Application.
Stacks
A stack is a Dock item that gives you fast access to a folder. When you click a Stack, the files within spring from the Dock in a fan or a grid, depending on the number of items (or the preference you set). Snow Leopard starts you off with three default Stacks: one for Applications, one for downloads, and the other for documents. The Applications stack will show all of your Applications and the Utilities folder, so you can quickly open apps or utilities. The Downloads Stack contains files you download from Safari, Mail, and iChat, and the Documents Stack is a great place to keep things such as presentations, spreadsheets, and word processing files. You can create as many Stacks as you wish simply by dragging folders to the right side of your Dock.
Tip: Within the Stack, you can click and drag on the icons in your fan or grid stack to another folder, the Trash, an external disc icon, your desktop, or other locations.
Fan
Fan Stacks shows a portion your folder content and arrange the icons so that the closest icon to the Dock is based on the order of the "Sort by" option you have selected.
For example, if you select the "Sort by" option of "Date Added", the Fan Stack will expand showing the icons of the most recently added items closest to the Dock. This is the default setting of your Downloads folder, making it easy to open, copy or move your latest download.
Grid
Grid Stacks will show the folder content as a matrix of icons arranged by your "Sort by" option.
In Snow Leopard, Gird Stacks are now scrollable and allow you to navigate folders. You can click a folder in the Stack to open that folder. An arrow button will appear in the upper left of the Stack you just opened. Click it to go back to the folder you came from. If there are more icons that can be shown, a scroll bar will appear.
Grid Stack elements

- Return to parent folder arrow. Click it to return to the parent folder.
- Scrollbar - Present only when there are more icons to show.
You can customize a Stack by right-clicking or control-clicking on the stack. The customize menu will include the following options:
- Sort by - You can select to have items sorted by Name, Date Added, Date Modified, Date Created, or Kind.
- Display as - Displays the icon in the Dock as the folder's actual icon or as a stack of icons of the folder contents.
- View content as - Determines what Stack type is used when you click the icon (see the below section about Stacks for details):
- Fan - Shows folder content in the Fan stack, organized by your sort option.
- Grid - Shows folder content in the Grid stack, organized by your sort option.
- List - Shows the folder contents as a list, organized by your sort option. Each sub-folder will open another list and so on, until you reach the end of the directory structure. To open an application or document, simply click it.
- Automatic - This lets Snow Leopard determine the best view content option. When there are a few items, the Fan stack is used. Once you have loaded your folder with enough items, Snow Leopard will change your view content type to the Grid stack.